
Joystick Control

Use your Android phone as a wireless controller for Windows PC games.

App Screenshots

About This App

Joystick Control turns your Android phone into a wireless virtual game controller for your Windows PC.

Designed for gamers who want a clean, responsive, and modern control experience, Joystick Control lets you connect your phone to your PC over the same local Wi-Fi/LAN network and control supported games using a fullscreen virtual gamepad.

To use the app, install and run Joystick Control Server on your Windows PC, then connect the Android app using automatic discovery, QR code pairing, or manual IP connection. Once connected, your phone becomes a landscape game controller ready for gameplay.

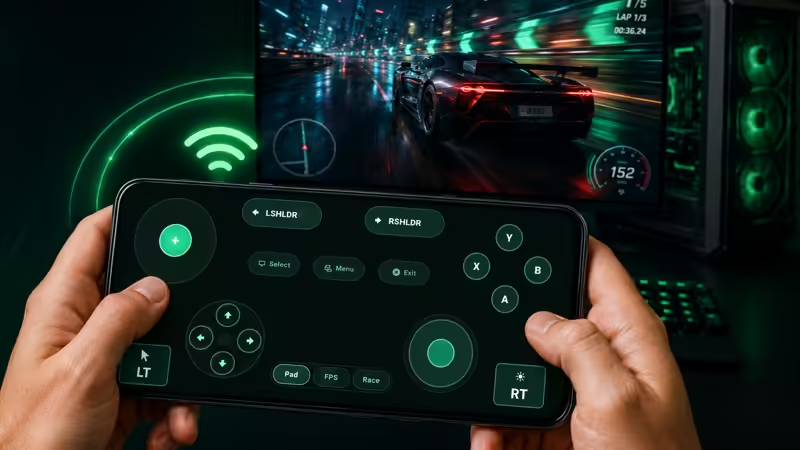
Joystick Control includes a full controller-style layout with:

• Left joystick for movement
• Right joystick for look or mouse control
• D-pad controls
• A, B, X, Y action buttons
• LT and RT trigger buttons
• Left and right shoulder buttons
• Select, Menu, and Exit buttons
• Pad, FPS, and Race control modes

The Windows server receives commands from your phone and converts them into keyboard and mouse input on your PC. This makes Joystick Control useful for different game types, including racing games, shooters, platformers, sandbox games, and custom control setups.

Joystick Control is built for fast setup and everyday use. You can connect through automatic local discovery, scan a QR code from the Windows server, or enter the server IP address manually when needed.

Main features:

• Wireless Android-to-Windows controller system
• Local Wi-Fi/LAN connection
• Automatic PC discovery
• QR code pairing
• Manual IP connection
• Fullscreen landscape controller
• Virtual joystick, D-pad, buttons, triggers, and shoulder controls
• Pad, FPS, and Race modes
• Responsive button feedback
• Vibration / haptic feedback
• Works with Joystick Control Server for Windows
• No account required
• Privacy-friendly local network design

Joystick Control Server also supports profiles and custom mapping on Windows, allowing phone controls to be mapped to keyboard and mouse actions. You can use built-in profile concepts or customize controls for your own gameplay style.

Important:

Joystick Control requires Joystick Control Server on a Windows PC.
Your Android phone and Windows PC should be connected to the same local network for best results.
Game compatibility can vary depending on the game, input settings, permissions, or anti-cheat behavior.

Joystick Control gives you a practical and modern way to use your Android phone as a wireless controller for your Windows PC.

Joystick Control — your Android phone, your Windows PC, your game controller.

App Details

Platform

Android

Availability

Google Play

Updates

Supported

Use Case

Productivity

Ready to Try This Android App?

Install the app from Google Play and start using it today.

Devallone Guide

Tutorial

Clean step-by-step guidance with a smoother reading experience.

Joystick Control Tutorial

This tutorial explains how to connect Joystick Control on Android with Joystick Control Server on Windows and start using your phone as a wireless controller for PC games.

Requirements

Before starting, make sure you have:

• An Android phone with Joystick Control installed
• A Windows PC with Joystick Control Server installed
• Phone and PC connected to the same Wi-Fi/LAN network
• Windows Firewall permission allowed for the server if requested

Joystick Control Server for Windows:
https://apps.microsoft.com/detail/9NZXRKHLLWNC

Step 1 — Install and open the Windows server

On your Windows PC, install and open Joystick Control Server.

The server dashboard shows important connection information such as:

• Server status
• PC IP address
• TCP port
• QR code pairing
• Connected phone count
• Activity logs
• Current profile status

Make sure the server is running before trying to connect from your phone.

Step 2 — Open Joystick Control on Android

Open the Joystick Control app on your Android phone.

The app gives you different ways to connect to your Windows PC:

• Automatic discovery
• QR code pairing
• Manual IP connection

For best results, keep both devices connected to the same local network.

Step 3 — Connect using automatic discovery

Automatic discovery is the easiest method when your phone and PC are on the same network.

  1. Open Joystick Control Server on Windows.
  2. Open Joystick Control on Android.
  3. Choose the automatic discovery option.
  4. Select your PC when it appears.
  5. Wait for the connection to complete.

After connection, your phone will switch to the controller screen.

Step 4 — Connect using QR code

QR pairing is useful when you want a fast and simple setup.

  1. Open Joystick Control Server on your Windows PC.
  2. Find the QR code shown in the server window.
  3. Open Joystick Control on your Android phone.
  4. Choose QR code connection.
  5. Scan the QR code from the Windows server.
  6. Wait for the app to connect.

Once connected, your phone becomes a fullscreen virtual controller.

Step 5 — Connect manually using IP address

Manual IP connection is useful if automatic discovery does not find your PC.

  1. Open Joystick Control Server on Windows.
  2. Copy the IP address and port shown in the server dashboard.
  3. Open Joystick Control on Android.
  4. Choose manual connection.
  5. Enter the IP address and port.
  6. Tap connect.

Make sure the IP and port are typed correctly.

Step 6 — Use the virtual controller

After connecting, your phone will display a landscape controller layout.

You can use:

• Left joystick for movement
• Right joystick for camera/look or mouse movement
• D-pad for directional input
• A, B, X, Y buttons for actions
• LT and RT triggers
• Left and right shoulder buttons
• Select, Menu, and Exit buttons

The controls are sent to the Windows server, then converted into keyboard and mouse input on your PC.

Step 7 — Choose a control mode

Joystick Control supports different layout modes for different game styles.

Available modes can include:

• Pad
• FPS
• Race

Choose the mode that fits the type of game you want to play.

Step 8 — Customize mappings on Windows

Joystick Control Server includes profile and mapping support.

You can use profile concepts such as:

• FPS / Shooter
• Racing
• Platformer
• Minecraft
• Custom

The Custom profile lets you edit mappings and assign phone controls to keyboard or mouse actions.

Example mappings:

• Left stick up → W
• Left stick down → S
• Left stick left → A
• Left stick right → D
• D-pad → Arrow keys
• A / Jump → Space
• Shoulder button → Shift or Ctrl
• Mouse action → Left click, right click, or middle click

After changing mappings, apply or save the profile so the connected phone can use the updated controls.

Step 9 — Test in a game

Open a PC game and test the controls.

Start with simple movement and action buttons first, then adjust mappings if needed.

Some games may require changing input settings inside the game. Compatibility can vary depending on the game, permissions, and how the game handles simulated keyboard or mouse input.

Troubleshooting

If the phone cannot find the PC:

• Make sure both devices are on the same Wi-Fi/LAN network
• Make sure Joystick Control Server is open and running
• Allow the server through Windows Firewall if Windows asks
• Try QR code pairing
• Try manual IP connection
• Restart the Android app and Windows server
• Check that the IP address and port are correct

If controls do not work in a game:

• Check the selected profile
• Check the keyboard and mouse mappings
• Try running the game in a normal input mode
• Test the controls on the desktop first
• Try another game to confirm the connection works

Joystick Control is designed to give you a clean Android-to-Windows wireless controller experience using your own local network.

Open the server, connect your phone, choose your profile, and start playing.